Luxa - Photoshop Tutorials and Resources
Members: 2,171 | Register
HomePhotoshop Video TutorialsFree Photoshop BrushesRegisterTag CloudTag CloudSubmit A New Article
Electifying Energy Beams Tutorial
 

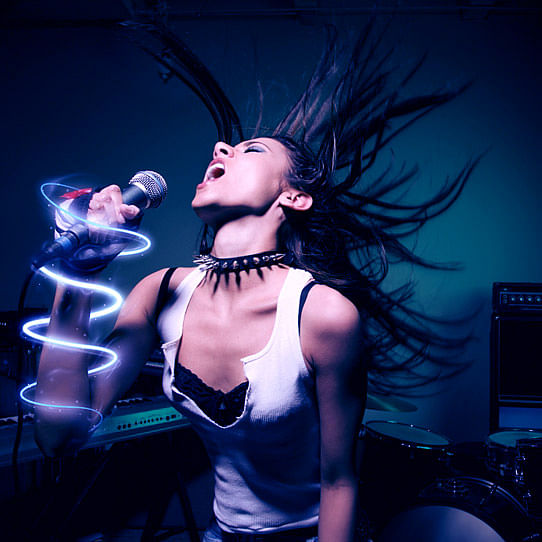
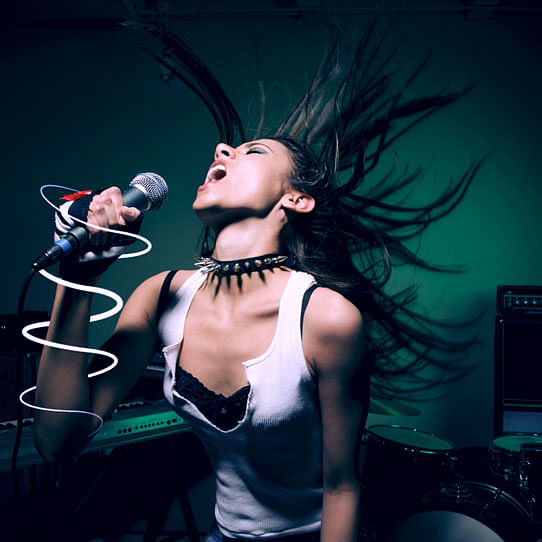
Here's a great effect that will bring some energy to your subject. We'll be wrapping this singer's arm with a glowing beam of light, adding sparkles, and adjusting the colors to make it all seem magical.
Firstly, create a new layer, then grab your Pen Tool (P) and draw out a spiraling path, as if you have a snake wrapped around the arm.
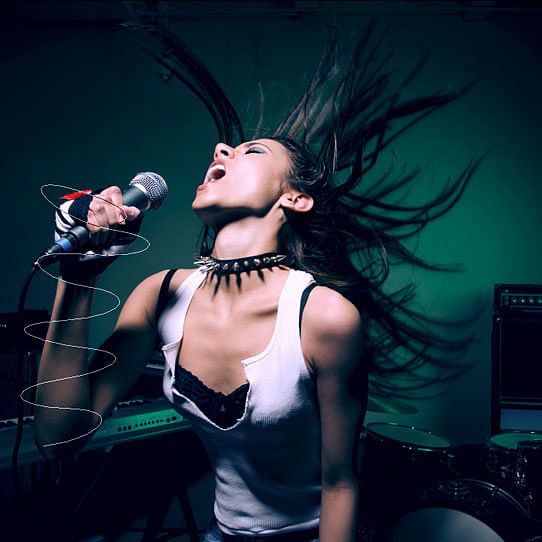
Then select the Brush Tool (B) and set your diameter to 7px, with the Opacity and Flow at 100%, and your foreground color set to white. With your path still on the artwork, go back to the Pen Tool, right click on the canvas, and choose "Stroke Path." A menu will appear with the Brush set as the Tool. Check "Simulate Pressure" and press OK. This will make the beginning and end of your stroke thinner.
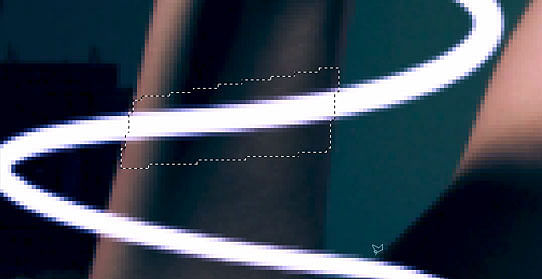
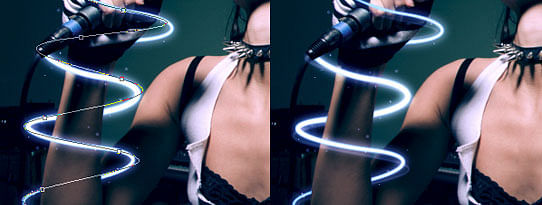
Now you need to delete the parts you want hidden behind the arm. With your stroke layer selected, choose "Add layer mask" at the bottom of the Layers Palette. Use the Polygonal Lasso Tool (L) to select areas of the arm you want in front of the stroke -- use your eye and imagine how this path will wrap around the arm. Make sure your mask is active by clicking on it, and fill these selected areas with black. They should now be cut out, appearing as if they're behind the arm.
Right click on your stroke layer and choose Blending Options. A Layer Style menu will appear, where you'll be adding an Inner and Outer Glow to the stroke, making the edges of it glow with a blue hue. Use the settings below:
Make a copy of your stroke layer and right click on the Layer Effects icon. Choose "Clear Layer Style" -- we simply want to blur this layer (about 6 pixels) to add another layer of glow. Everything's looking nice and illuminated here, so let’s add some sparkles. With your Brush Tool, add some quick spots around your glowing path with varying small brush sizes (3 - 5px). Make as many as you want here, as you're always free Erase undesired sparkles.
We're now going to make a secondary stroke to create another level of motion. Use the Pen Tool to go over your original path, but make it a bit different and overlap parts. Select a smaller diameter brush this time with a 50% opacity, and stroke the path as before.
Our energy beam is nearly there. To make the effect more dramatic, you can adjust the overall hue of your photo. Create a new Curves adjustment layer, and tweak the colors to get a vibrant blue atmosphere. Download the Curves preset below to load it in your document. After your colors are locked in, use the Dodge Tool (O) (with a diameter of 35 pixels and the exposure set to 25%) to brush in some highlights underneath your beam, directly on the background photo. This makes it appear as if your beam is casting light on to the arm.
Download blue.acv
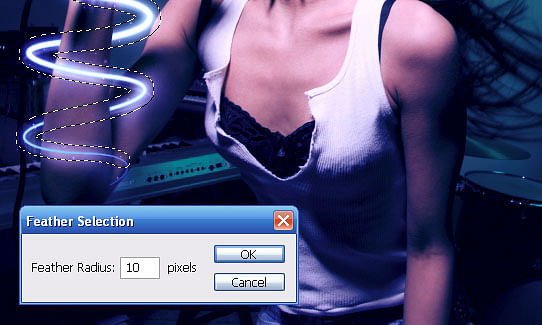
For the last part of this effect, we'll add one more layer of shimmer. Hold down Ctrl and click on your main stroked path in the layers palette -- your path should now be selected. Go to Select › Modify › and Expand the selection by 7px, then feather it by 10px.
Now select your background photo layer and apply a Plastic Wrap filter, found in your Artistic filters. This will add some wispy lines around your path. Set the Highlight Strength to 20, the Detail to 6, and the Smoothness to 8. Finally, lightly Gaussian Blur your background layer with the feathered selection still active.
Back Home

Comments
haha
it\'s not it.. it\'s the settings dammit.
done
oopss.. never mind.. i got it.. i was using the wrong brush all along. :( i was using the soft edges brush instead of the hard one...so yeah.. i got it now! great tut!!!
*not quite done*
i did it! with improvisations though.. i couldn\'t get the \"simulate stroke\" thing to work (even though i selected it already) so i manually made the ends thinner using the eraser tool.. but can anybody tell me why my \"simulate stroke\" doesn\'t work?
yeah... same prob here.. i already selected the \"simulate pressure\" option but then when i click ok no thinner-ends-of-the-line happens...
Funky Joe
A sample psd would be nice.
nathann..
When i try to choose stroke paths it is greyed out!! why is this happening? please email me i_am_chenny@hotmail.com =]
gabi
Whenever I use the blending it only does it to the parts I cut out....
dtdrtk
v7B0xY <a href=\"http://cezrocqtowff.com/\">cezrocqtowff</a>, [url=http://tmbiitqrgdyy.com/]tmbiitqrgdyy[/url], [link=http://uxjctltnzlvo.com/]uxjctltnzlvo[/link], http://hstccfjdxygj.com/
Ciaran
Hey, this is an awesome tut, though i can do everything sorta well - i get stuck @ the curves bit ~ Could sum1 help me get outta this mess :X
Tini
Worked great! Kudos ^.^
camel
If the Chinese like to have, and this phrase is translated GG
None of your business
I can help, here is the fact of how to use the PEN TOOL. Firstly, create a new layer, then grab your Pen Tool (P) and click on PATH small icon on top of photoshop and click on freeform pen tool and draw, you all set. I'm smarter than who created this effect.
YUVAL
heyy i'm having a problem with coloring in the parts you don't want to get the effect of it going around the arm. when i use the Paint Bucket Tool (G) with the color black, the part i chose with the Polygonal Lasso Tool (L) turns white and when i try using white it doesn't do anything. please help me i really want to know how to do this. thank you soo much :)
Ben
The problem people are encountering with the "Stroke Path"-option not being available is due to that you haven't got a valid layer for the stroke to appear in. From the Photoshop help: "When you stroke a path, the color values appear on the active layer. Make sure that the layer you want is active before beginning. You cannot stroke a path when a layer mask or text layer is active."
samus
je sais pa comment le telecharger
comment on le telecharge
Entwickler
one of the best ive ever seen !
^çu
yeah
frank
salut je veu etre membre de luxa comunauté
Netherlands
Your Pen Tool doesn't Simulate Pressure? Try this out: Select your Brush tool then go to: “window>brushes” and turn on “shape dynamics” Then go back to your Pen Tool, en try again. It will work now! :-)
GP
awesome and so easy to make it
jamezone
its gr888 well i have a problem regarding lasso tool i am stuck between lasso tool step plz help me out
Dude
So yeah, this is awesome.. But when I do the Pen Tool (1st step) it wants to create a shape with what I draw. How do I disable that?
Mr.Willy
that was absolutly really amazing darling!! It is so easy to who is starting. Now I'm an professional!!jaa
BlogBusters
Nice and really good stuff!
skjoong
thank you
skjoong
thank you ~~^^
jon
for some reason, i can't currently get the little dots to show up. i'm stuck at this point and confused as to why i am the only one so far! i must be missing something blatantly obvious...
brendaorg333
Everybody is very recommend to visit the portal interesting sites: http://farise.cn
zeyad adnan
very Goooooooooooooood
Nick
National Transportation Safety Board recently divulged they had funded a project with the US auto makers for the past five years.
Grundy
I filled in the spots with black, and then I go to blending options, and I can only get the glow to work on the spots that I've removed, not on the whole line...
sasuke
super sarisss
ta shido
lana lang
cool
dinesh
marvellous job and thinking
brittany
ur awesome!! this glowing trick is so trippy!
lavanaya
Excelent presentation.very nice
Naima
Well nice sharing www.templatesmission.com
jonathan
ive tried everything & still cant get the lines to fade. i did everything step by step -create new layer -create path with pen -select brush add size -select pen -right click (click simulate pressure) BUT THE LINES STILL DONT FADE!!! someone correct me please!
Gaijin
AWESOME
alex
i have a newer version of photoshop and its confusing, i wold be good if you updated ur software
Roseeee
How the hell do I work the pen tool? I'm not familiar with it... someone help me... E-mail me at xxrxcxx@hotmail.com Pleasssssse.
bratwurst
this is the best use of the pen tool i've seen yet! TAKE A BOW!!!!
John
Nice work. But the pen tool is my enemy.
nadiadxb
woooh its nice ! www.eyecatchypics.com
Christina
its really grt one i have ever seen! chk this also plz Best Web Templates on the Net http://www.templatesmission.com
fantastic ! :)
voila
nice effect but poor communication, you leave out critical information.
where do i put the .acv file !!!
Toma01
Great work!
Smashingapps.com
This is great.
Jack
Go back to vietnam
luis
explique mas detalladmente ps
jonny
porfavor una de estas buenas paginas en español gracias
the nicky
quisiera pedirles un favor si la pagina lo pueden traducir al castellano como dice una chica no soy experto en ingles
estefania
y mi pos t
estefania
creo que igual podrianponer enespañol esta pagina esta super buena acjhuda mucho plis les pidiria eso ya que nosoyuna esperta en ingles y me cuesta mucho tradusir eso para aplicarlo a mis fotos espero lo lean y agan algo para mejorarlo adios
shangdragon
Fantastic stuff, thanks!
Flux
First. Thx u very much for this tutorial... i enjoyed that. I recomend one modiffication, to make more easly: in the step of "another level of motion" u can replace this step for a "DROP SHADOW" efect in a blending option... u can no modify to much te diference... but yes can see a good finish. (sorry for my inglish) this is my work with this tutorial: http://www.estudioicaro.com.ar/headswall.jpg
liam
to kyra & anyone else who cant get the line to fade. What you need to do is check that you are clicking "Simulate pressure" check box when you apply the brush to the path. And anyone who is still seeing the lines after they apply the brush, this means you still have the path there. You need to use the pen tool - then Right Mouse click, and go to delete path.
eshop600
nice one, really like your tutorial
Mr. Javo
wow awesome! definitively photoshop is amazing, the limit is your imagination :)
Archer
Could someone who is good at this email me, I need to ask for help meanalias@yahoo.com
Invader05
very hot stuff nice tutorial :D
Jeff
esieds, make sure your path is on a new layer, not the Background layer.
esieds
Could anyone please tell me why I cannot click to add the mask? There must be some small step I am missing, but it would be greatly appreciated if someone could offer any insight.
Sonic74
Very good... thanks for the tutorial
Fizzle
Nice. Any of your tuts please email or foward them too RaitoAsura@hotmail.com Outcome:http://i97.photobucket.com/albums/l219/justin2dope/slash.png
tarquin
hi, newbie to photoshop here! i need help after the step, "simulate pressure"..i'm totally lost...tnx for posting!
roddog
Very nice!
Hiric
Thank you for this tutorial... Stumbling, deliciousing and feeding in seconds :)
beginner
u didn't make things clear. so hard dor me..
xxx
thx for the tutorial. helped me a lot
haxan
a very nice tutorial
sd
awesome stuff! thanks
Ry Guy
Great work....I'm going to try it myself now! Thanks so much for sharing!
alienoXcaso
Wowow, i need it. TKS
Jeff
ozzy, you should be filling in the Layer Mask with black, not the layer itself.
ozzy
what do you mean by fill it with BLACK? like literaly color over it? cause that just makes a black square...
help me
why cant i get the stroke path to work
prittypiglet
wow !!! thats so cool ! im goin to try that ! :)
Dave
Yeah that looks damn hot. That photoshop effect is good too. Muah ha ha ha...
someDude
does anyone know why i can still see the pen strokes after the masking and deleting part?
Woman
I cant get the but behind her arm to work! help?
wasim Asghar
This is superorb excellent u make this one
Noelle
Grr, The 'plastic wrap' still appears when I attempt at making it look like its circling my image..can anyone help me? >_< Thanks. -Noelle
heeeeeelllllpppppp!!!!!!plz
i need help my email adress is dylanlowe_6@hotmail.com email me and tell me about the pen tool or send the curve path plzzzzzzzzzzz!!!!!.....
photoboy
i need help in the pen tool i cant make the curve and the download doesnt work plz help....
Teufela
FRIGGIN AWESOME ^^ i just put that around a macbook pro to try out hehehe works so well and its so simple :D! love it!
cress
Amazing. Love the lady.
doromay64
fun stuff, cool tutorial. Thank you for expanding my horizons
Melodic
I have a feeling this would be difficult to follow for a newcomer, but it works well enough when you know what you're doing. One problem is that the original stroke layer is on top of the picture, and therefor when you plastic wrap that layer you get wrap showing on the arm. Easily cleanable but is nowhere stated in the tutorial.
yo
nice but its hard to draw with the pen tool!!!
SketchFall
*dies* Thank you so much! This is really great!!!
asdfghjkl;
What version of photoshop are you using because when I try to do the blending options my options are different than the ones in the tutorial?
crusher
Nice work!
CubidoN
WoW! Great TuTorial! Thank you very much!
Big Mike
Man, so simple, yet very effective. Great Job!
Jeff
I cant get to the part where it says stroke path... where is that?
Dev
This is options i like very much tnks
Rhon
nice
lucie
How do you make the line with the pen tool, at the start, without it filling in?
abon
omg
floy
u rule! that's great!
Amber
Wow that's cool and simple to do!
David
Is there anyway you could show me how to do this with an arrow ? I want a double sided arrow going around a sphere . I know this is probably very simple to do but im going in the completely wrong direction .
craig
I was looking for something like this, great!
Silver
Awesome! :3
JPDesigns
Good Tutorial! Thanks!
not telling
so what i can do that and i am 10
Henken
Ok I found out what the problems were. I selected the brush tools and under the brush's options I decreased the space between the dots that make the line :)
Henken
I have 2 questions: 1. Photoshop wants me to seal up my that (to end at the starting point on my path). Your path is just a snaky line which ends do not meat up. How do u do that? 2. When I select Stroke Path and press ok in all boxes, a complete line does not shop up on my path. Instead, only a few dots of my brush append on my path :( What am I doing wrong? THX
Ben
This is really cool what you did with the picture... But Im a beginer at photoshop and its hard for me to get around it If you explain more in details on how to use the pen tool that would be great Great work!!
herve
when im done making a spiral how do i deselect it so that all i see are the lines not the little squares.
Benny_1
plzz someone who made the pic. show what you did with the pressure i also got that problem....
Hani
Dynamic, energyful
help
hey that nice but am begginer so hope u give me little help my msn is zoro_1992@hotmail.com please help me it's my career
Aydin
http://i98.photobucket.com/albums/l266/aydin76/ArmFinal.jpg my attempt at this tutorial, very nice tut cheers 2 whoever made it
txuben
good work, it's a beautiful effect of light effect (sorry for my english)
t0rch1ld
cool :D but i cant get it to work ! :( do you have to make selection before you add stroke path ? :)
asdf
wow first tutorial stumble upon found me thats actually pretty cool
Markus
This is great! The first time I tried it, it didn't work so well (mostly because I don't know my way around a pen too fully yet), but the second time I used a better picture as well, and look what I managed! http://i3.photobucket.com/albums/y97/ieatpenguins/sparklingavatar.jpg
burner
or you could just give the singer some ElWire before the performance :)
clavin
next time use a picture with more cleavage!
Diver Dan
Holtadit why dont you just right click and copy?
Holtadit
can u giv me the url to the place u got the pic. THNX!!!
Tayfun
Fantastic
n0fx
very neat!
Jenny
wow that's awesome!!
dee (aust) :)
soz sean... i read your msg wrong.. (fri nite had abit to drink) ;-p lolz
dee (aust) :)
nice effect.. luv the colours...the blue swirl flows in well with the image not taking away the motion of the picture if it were to be a energy colour red. Sorry sean steezy :)
kyra
i must just be dumb but the line wont get thin at the end what ever i do, obviuosly hard if you dont have a pen tab because you cant ger curved lines. and always looks a bit weird. looks nice tho if you know how to do it
tarun
good good
sean steezy
yeah, i agree, this is a really cool effect and it works really well in almost any situation. Fire effect can be hinted at by changing hue to red. its great becasue of the energy it infused into an otherwise lame image.
Will
When I use stimulate pressure its doesnt make the beginning and end of my stroke thinner, it just looks the same all the way. Any idea of what could be wrong?
shadowbolt
:D nice one. /respect
RiC.
yOO! NiCE TUTORiAL. . i NEED HELP ON DOWNLOADiNG DA BLUE THiNGy. . ANyONE kNOE WERE 2 PUT iT?
javb15
Awesome!!
Jeff
graphix, I think the problem may be that your Pen Tool is set up for Shapes, not Paths. Make sure the Pen toolbar options has "Paths" active like this:
graphix
yea i have the same problem, the stroke path isnt available, and its making me rasterize it b4 i can do anything? any suggestions?
Stefano =] (brazil)
i love you a LOT
flash
to adam, yes you can.... http://www.anothera.net/view_tutorial.php?id=3 nice tut, kinda similar to mine
0-(-'-0)
...........I LOVE YOU!!
FunkyBoy
How can i do simulation pressure?
Name:

Comment: